viernes, 29 de marzo de 2019

Top 18 Highest Paying URL Shortener to Earn Money Online 2019

  1. Oke.io

    Oke.io provides you an opportunity to earn money online by shortening URLs. Oke.io is a very friendly URL Shortener Service as it enables you to earn money by shortening and sharing URLs easily.
    Oke.io can pay you anywhere from $5 to $10 for your US, UK, and Canada visitors, whereas for the rest of the world the CPM will not be less than $2. You can sign up by using your email. The minimum payout is $5, and the payment is made via PayPal.
    • The payout for 1000 views-$7
    • Minimum payout-$5
    • Referral commission-20%
    • Payout options-PayPal, Payza, Bitcoin and Skrill
    • Payment time-daily

  2. Fas.li

    Although Fas.li is relatively new URL Shortener Service, it has made its name and is regarded as one of the most trusted URL Shortener Company. It provides a wonderful opportunity for earning money online without spending even a single $. You can expect to earn up to $15 per 1000 views through Fas.li.
    You can start by registering a free account on Fas.li, shrink your important URLs, and share it with your fans and friends in blogs, forums, social media, etc. The minimum payout is $5, and the payment is made through PayPal or Payza on 1st or 15th of each month.
    Fas.li also run a referral program wherein you can earn a flat commission of 20% by referring for a lifetime. Moreover, Fas.li is not banned in anywhere so you can earn from those places where other URL Shortening Services are banned.
  3. Short.am

    Short.am provides a big opportunity for earning money by shortening links. It is a rapidly growing URL Shortening Service. You simply need to sign up and start shrinking links. You can share the shortened links across the web, on your webpage, Twitter, Facebook, and more. Short.am provides detailed statistics and easy-to-use API.
    It even provides add-ons and plugins so that you can monetize your WordPress site. The minimum payout is $5 before you will be paid. It pays users via PayPal or Payoneer. It has the best market payout rates, offering unparalleled revenue. Short.am also run a referral program wherein you can earn 20% extra commission for life.
  4. Cut-win

    Cut-win is a new URL shortener website.It is paying at the time and you can trust it.You just have to sign up for an account and then you can shorten your URL and put that URL anywhere.You can paste it into your site, blog or even social media networking sites.It pays high CPM rate.
    You can earn $10 for 1000 views.You can earn 22% commission through the referral system.The most important thing is that you can withdraw your amount when it reaches $1.
    • The payout for 1000 views-$10
    • Minimum payout-$1
    • Referral commission-22%
    • Payment methods-PayPal, Payza, Bitcoin, Skrill, Western Union and Moneygram etc.
    • Payment time-daily

  5. BIT-URL

    It is a new URL shortener website.Its CPM rate is good.You can sign up for free and shorten your URL and that shortener URL can be paste on your websites, blogs or social media networking sites.bit-url.com pays $8.10 for 1000 views.
    You can withdraw your amount when it reaches $3.bit-url.com offers 20% commission for your referral link.Payment methods are PayPal, Payza, Payeer, and Flexy etc.
    • The payout for 1000 views-$8.10
    • Minimum payout-$3
    • Referral commission-20%
    • Payment methods- Paypal, Payza, and Payeer
    • Payment time-daily

  6. Clk.sh

    Clk.sh is a newly launched trusted link shortener network, it is a sister site of shrinkearn.com. I like ClkSh because it accepts multiple views from same visitors. If any one searching for Top and best url shortener service then i recommend this url shortener to our users. Clk.sh accepts advertisers and publishers from all over the world. It offers an opportunity to all its publishers to earn money and advertisers will get their targeted audience for cheapest rate. While writing ClkSh was offering up to $8 per 1000 visits and its minimum cpm rate is $1.4. Like Shrinkearn, Shorte.st url shorteners Clk.sh also offers some best features to all its users, including Good customer support, multiple views counting, decent cpm rates, good referral rate, multiple tools, quick payments etc. ClkSh offers 30% referral commission to its publishers. It uses 6 payment methods to all its users.
    • Payout for 1000 Views: Upto $8
    • Minimum Withdrawal: $5
    • Referral Commission: 30%
    • Payment Methods: PayPal, Payza, Skrill etc.
    • Payment Time: Daily

  7. Wi.cr

    Wi.cr is also one of the 30 highest paying URL sites.You can earn through shortening links.When someone will click on your link.You will be paid.They offer $7 for 1000 views.Minimum payout is $5.
    You can earn through its referral program.When someone will open the account through your link you will get 10% commission.Payment option is PayPal.
    • Payout for 1000 views-$7
    • Minimum payout-$5
    • Referral commission-10%
    • Payout method-Paypal
    • Payout time-daily

  8. Linkbucks

    Linkbucks is another best and one of the most popular sites for shortening URLs and earning money. It boasts of high Google Page Rank as well as very high Alexa rankings. Linkbucks is paying $0.5 to $7 per 1000 views, and it depends on country to country.
    The minimum payout is $10, and payment method is PayPal. It also provides the opportunity of referral earnings wherein you can earn 20% commission for a lifetime. Linkbucks runs advertising programs as well.
    • The payout for 1000 views-$3-9
    • Minimum payout-$10
    • Referral commission-20%
    • Payment options-PayPal,Payza,and Payoneer
    • Payment-on the daily basis

  9. Shrinkearn.com

    Shrinkearn.com is one of the best and most trusted sites from our 30 highest paying URL shortener list.It is also one of the old URL shortener sites.You just have to sign up in the shrinkearn.com website. Then you can shorten your URL and can put that URL to your website, blog or any other social networking sites.
    Whenever any visitor will click your shortener URL link you will get some amount for that click.The payout rates from Shrinkearn.com is very high.You can earn $20 for 1000 views.Visitor has to stay only for 5 seconds on the publisher site and then can click on skip button to go to the requesting site.
    • The payout for 1000 views- up to $20
    • Minimum payout-$1
    • Referral commission-25%
    • Payment methods-PayPal
    • Payment date-10th day of every month

  10. Adf.ly

    Adf.ly is the oldest and one of the most trusted URL Shortener Service for making money by shrinking your links. Adf.ly provides you an opportunity to earn up to $5 per 1000 views. However, the earnings depend upon the demographics of users who go on to click the shortened link by Adf.ly.
    It offers a very comprehensive reporting system for tracking the performance of your each shortened URL. The minimum payout is kept low, and it is $5. It pays on 10th of every month. You can receive your earnings via PayPal, Payza, or AlertPay. Adf.ly also runs a referral program wherein you can earn a flat 20% commission for each referral for a lifetime.
  11. Bc.vc

    Bc.vc is another great URL Shortener Site. It provides you an opportunity to earn $4 to $10 per 1000 visits on your Shortened URL. The minimum withdrawal is $10, and the payment method used PayPal or Payoneer.
    Payments are made automatically on every seven days for earnings higher than $10.00. It also runs a referral system wherein the rate of referral earning is 10%.
    • The payout for 1000 views-$10
    • Minimum payout -$10
    • Referral commission-10%
    • Payment method -Paypal
    • Payment time-daily

  12. LINK.TL

    LINK.TL is one of the best and highest URL shortener website.It pays up to $16 for every 1000 views.You just have to sign up for free.You can earn by shortening your long URL into short and you can paste that URL into your website, blogs or social media networking sites, like facebook, twitter, and google plus etc.
    One of the best thing about this site is its referral system.They offer 10% referral commission.You can withdraw your amount when it reaches $5.
    • Payout for 1000 views-$16
    • Minimum payout-$5
    • Referral commission-10%
    • Payout methods-Paypal, Payza, and Skrill
    • Payment time-daily basis

  13. Linkrex.net

    Linkrex.net is one of the new URL shortener sites.You can trust it.It is paying and is a legit site.It offers high CPM rate.You can earn money by sing up to linkrex and shorten your URL link and paste it anywhere.You can paste it in your website or blog.You can paste it into social media networking sites like facebook, twitter or google plus etc.
    You will be paid whenever anyone will click on that shorten a link.You can earn more than $15 for 1000 views.You can withdraw your amount when it reaches $5.Another way of earning from this site is to refer other people.You can earn 25% as a referral commission.
    • The payout for 1000 views-$14
    • Minimum payout-$5
    • Referral commission-25%
    • Payment Options-Paypal,Bitcoin,Skrill and Paytm,etc
    • Payment time-daily

  14. Dwindly

    Dwindly is one of the best URL Shorten to earn money online. It offers the opportunity to earn money for every person that views links you have created.
    Its working is simple. You need to create an account and then shorten any URLs with a click of a button. Go on to share your shortened URLs on the internet, including social media, YouTube, blogs, and websites. And finally, earn when any person clicks on your shortened URL.
    They offer the best environment to you for earning money from home. They have even come up with a referral system where you can invite people to Dwindly and earn as much as 20% of their income.
    It has built-in a unique system wherein you get the opportunity to increase your daily profits when you analyze your top traffic sources and detailed stats.
    Best of all, you get the highest payout rates. The scripts and the APIs allow you to earn through your websites efficiently.
    Last but not the least you get payments on time within four days.
  15. Short.pe

    Short.pe is one of the most trusted sites from our top 30 highest paying URL shorteners.It pays on time.intrusting thing is that same visitor can click on your shorten link multiple times.You can earn by sign up and shorten your long URL.You just have to paste that URL to somewhere.
    You can paste it into your website, blog, or social media networking sites.They offer $5 for every 1000 views.You can also earn 20% referral commission from this site.Their minimum payout amount is only $1.You can withdraw from Paypal, Payza, and Payoneer.
    • The payout for 1000 views-$5
    • Minimum payout-$1
    • Referral commission-20% for lifetime
    • Payment methods-Paypal, Payza, and Payoneer
    • Payment time-on daily basis

  16. CPMlink

    CPMlink is one of the most legit URL shortener sites.You can sign up for free.It works like other shortener sites.You just have to shorten your link and paste that link into the internet.When someone will click on your link.
    You will get some amount of that click.It pays around $5 for every 1000 views.They offer 10% commission as the referral program.You can withdraw your amount when it reaches $5.The payment is then sent to your PayPal, Payza or Skrill account daily after requesting it.
    • The payout for 1000 views-$5
    • Minimum payout-$5
    • Referral commission-10%
    • Payment methods-Paypal, Payza, and Skrill
    • Payment time-daily

  17. Al.ly

    Al.ly is another very popular URL Shortening Service for earning money on short links without investing any single $. Al.ly will pay from $1 to $10 per 1000 views depending upon the different regions. Minimum withdrawal is only $1, and it pays through PayPal, Payoneer, or Payza. So, you have to earn only $1.00 to become eligible to get paid using Al.ly URL Shortening Service.
    Besides the short links, Al.ly also runs a referral program wherein you can earn 20% commission on referrals for a lifetime. The referral program is one of the best ways to earn even more money with your short links. Al.ly offers three different account subscriptions, including free option as well as premium options with advanced features.
  18. Ouo.io

    Ouo.io is one of the fastest growing URL Shortener Service. Its pretty domain name is helpful in generating more clicks than other URL Shortener Services, and so you get a good opportunity for earning more money out of your shortened link. Ouo.io comes with several advanced features as well as customization options.
    With Ouo.io you can earn up to $8 per 1000 views. It also counts multiple views from same IP or person. With Ouo.io is becomes easy to earn money using its URL Shortener Service. The minimum payout is $5. Your earnings are automatically credited to your PayPal or Payoneer account on 1st or 15th of the month.
    • Payout for every 1000 views-$5
    • Minimum payout-$5
    • Referral commission-20%
    • Payout time-1st and 15th date of the month
    • Payout options-PayPal and Payza

Android Jetpack Navigation Stable Release

Posted by Ian Lake, Software Engineering Lead & Jisha Abubaker, Product Manager

Cohesive tooling and guidance for implementing predictable in-app navigation

Today we're happy to announce the stable release of the Android Jetpack Navigation component.

The Jetpack Navigation component's suite of libraries, tooling and guidance provides a robust, complete navigation framework, freeing you from the challenges of implementing navigation yourself and giving you certainty that all edge cases are handled correctly.

With the Jetpack Navigation component you can:

  • Handle basic user actions like Up & Back buttons so that they work consistently across devices and screens.
  • Allow users to land on any part of your app via deep links and build consistent and predictable navigation within your app.
  • Improve type safety of arguments passed from one screen to another, decreasing the chances of runtime crashes as users navigate in your app.
  • Add navigation experiences like navigation drawers and bottom navigation consistent with the Material Design guidelines.
  • Visualize and manipulate your navigation flows easily with the Navigation Editor in Android Studio 3.3

The Jetpack Navigation component adheres to the Principles of Navigation, providing consistent and predictable navigation no matter how simple or complex your app may be.

Simplify navigation code with Jetpack Navigation Libraries

The Jetpack Navigation component provides a framework for in-app navigation that makes it possible to abstract away the implementation details, keeping your app code free of navigation boilerplate.

To get started with the Jetpack Navigation component in your project, add the Navigation artifacts available on Google's Maven repository in Java or Kotlin to your app's build.gradle file:

 dependencies {     def nav_version = 2.0.0      // Java     implementation "androidx.navigation:navigation-fragment:$nav_version"     implementation "androidx.navigation:navigation-ui:$nav_version"      // Kotlin KTX      implementation "androidx.navigation:navigation-fragment-ktx:$nav_version"     implementation "androidx.navigation:navigation-ui-ktx:$nav_version"   }

Note: If you have not yet migrated to androidx.*, the Jetpack Navigation stable component libraries are also available as android.arch.* artifacts in version 1.0.0.

navigation-runtime : This core library powers the navigation graph, which provides the structure of your in-app navigation: the screens or destinations that make up your app and the actions that link them. You can control how you navigate to destinations with a simple navigate() call. These destinations may be fragments, activities or custom destinations.

navigation-fragment: This library builds upon navigation-runtime and provides out-of-the-box support for fragments as destinations. With this library, fragment transactions are now handled for you automatically.

navigation-ui: This library allows you to easily add navigation drawers, menus and bottom navigation to your app consistent with the Material Design guidelines.

Each of these libraries provide an Android KTX artifact with the -ktx suffix that builds upon the Java API, taking advantage of Kotlin-specific language features.

Tools to help you build predictable navigation workflows

Available in Android Studio 3.3 and above, the Navigation Editor lets you visually create your navigation graph , allowing you to manage user journeys within your app.

With integration into the manifest merger tool, Android Studio can automatically generate the intent filters necessary to enable deep linking to a specific screen in your app. With this feature, you can associate URLs with any screen of your app by simply setting an attribute on the navigation destination.

Navigation often requires passing data from one screen to another. For example, your list screen may pass an item ID to a details screen. Many of the runtime exceptions during navigation have been attributed to a lack of type safety guarantees as you pass arguments. These exceptions are hard to replicate and debug. Learn how you can provide compile time type safety with the Safe Args Gradle Plugin.

Guidance to get it right on the first try

Check out our brand new set of developer guides that encompass best practices to help you implement navigation correctly:

What developers say

Here's what Emery Coxe, Android Lead @ HomeAway, has to say about the Jetpack Navigation component :

"The Navigation library is well-designed and fully configurable, allowing us to integrate the library according to our specific needs.

With the Navigation Library, we refactored our legacy navigation drawer to support a dynamic, runtime-based configuration using custom views. It allowed us to add / remove new screens to the top-level experience of our app without creating any interdependencies between discreetly packaged modules.

We were also able to get rid of all anti-patterns in our app around top-level navigation, removing explicit casts and hardcoded assumptions to instead rely directly on Navigation. This library is a fundamental component of modern Android development, and we intend to adopt it more broadly across our app moving forward.

Get started

Check out the migration guide and the developer guide to learn how you can get started using the Jetpack Navigation component in your app. We also offer a hands-on codelab and a sample app.

Also check out Google's Digital Wellbeing to see another real-world example of in-app navigation using the Android Jetpack Navigation component.

Feedback

Please continue to tell us about your experience with the Navigation component. If you have specific feedback on features or if you run into any issues, please file a bug via one of the following links:

Advantages & Disadvantages Of Optical Fibres


Must See Places In Paris
Find IP You Are visitor no.
                       ADVANTAGES
DISADVANTAGES
  
 Bandwidth- Fibre optic cables have a much greater bandwidth than metal cables. The amount of information that can be transmitted per unit time of fibre over other transmission media is its most significant advantage.  With the high performance single mode cable used by telephone industries for long distance telecommunication, the bandwidth surpasses the needs of today's applications and gives room for growth tomorrow.   Low Power Loss - An optical fibre offers low power loss.  This allows for longer transmission distances.  In comparison to copper; in a network, the longest recommended copper distance is 100m while with fibre, it is 2000m. 
 Interference- Fibre optic cables are immune to electromagnetic interference.  It can also be run in electrically noisy environments without concern as electrical noise will not affect fibre. 
 Size - In comparison to copper, a fibre optic cable has nearly 4.5 times as much capacity as the wire cable has and a cross sectional area that is 30 times less. 
 Weight- Fibre optic cables are much thinner and lighter than metal wires.  They also occupy less space with cables of the same information capacity.  Lighter weight makes fibre easier to install. 
 Safety- Since the fibre is a dielectric, it does not present a spark hazard. 
 Security- Optical fibres are difficult to tap.  As they do not radiate electromagnetic energy, emissions cannot be intercepted.  As physically tapping the fibre takes great skill to do undetected, fibre is the most secure medium available for carrying sensitive data. 
 Flexibility - An optical fibre has greater tensile strength than copper or steel fibres of the same diameter.  It is flexible, bends easily and resists most corrosive elements that attack copper cable. 
Cost - The raw materials for glass are plentiful, unlike copper.  This means glass can be made more cheaply than copper.  
 
 Cost - Cables are expensive to install but last longer than copper cables.   Transmission - transmission on optical fibre requires repeating at distance intervals. 
 Fragile - Fibres can be broken or have transmission loses when wrapped around curves of only a few centimetres radius.  However by encasing fibres in a plastic sheath, it is difficult to bend the cable into a small enough radius to break the fibre. 
 Protection - Optical fibres require more protection around the cable compared to copper.

SUPER HERO PACK FOR SA!

SUPER HERO PACK! [SpiderMan, SuperMan, Hulk, Avengers, Etc..]


STEPS:
1. First You'll Need Your Gta SA Game & Es File Explorer.
2. Open Es File Explorer And Go To InternalStorage>Android>OBB And Rename The com.rockstargames.gtasa Folder As com.rockstargames.com1
3. After Renaming The com.rockstargames.gtasa Folder Uninstall The Original Apk Of The Game.
4. After Above Steps DOWNLOAD The Below 2 Files.


??DOWNLOAD SUPERHEROES DATA

5. Now Install The Above DOWNLOADED APK File. And Rename The com.rockstargames.gtasa1 Into com.rockstargames.gtasa

6. Then Open Es File Explorer And Find Your SUPERHEROES Data Which You Downloaded. And Extract It To Your InternalStorage>Android>Data>com.rockstargames.gtasa

7. After Extraction. Open Your Game. While Playing Swipe Your Screen From Top To Bottom Then Select The Skin Selector Option And Enjoy Your SUPERHEROES!

WATCH VIDEO TUTORIAL IF YOU HAVE DOUBT!


jueves, 28 de marzo de 2019

Overkill's The Walking Dead - Review


overkill's the walking dead, overkill's the walking dead review, overkill's the walking dead ps4, overkill's the walking dead


Overkill's The Walking Dead - Review

Overkill's The Walking Dead is a sincere endeavor to convey a helpful adventure set in the notable Walking Dead universe, yet that effort feels somewhat like it's very little past the point of no return, as Overkill's The Walking Dead frequently doesn't feel like a shooter by any stretch of the imagination. It takes the rules built up by Robert Kirkman's comic series and its consequent TV adaption to heart in the wrong ways, forcing uneven decides on its missions that intensely restrict how you're able to play. Combined with a confounding combination of survival mechanics covered in unintuitive menus, useless customization choices, and non-existent incentives to enhance your gear, The Walking Dead feels foul and unfocused. 


Quick Facts:


  • Initial release date: 6 November 2018
  • Engine: Unreal Engine
  • Developer: Overkill Software
  • Genre: First-person shooter
  • Platforms: PlayStation 4, Xbox One, Microsoft Windows


 Overkill's The Walking Dead is a game about apparently thoughtless butcher with not very many plot strings drawing an obvious conclusion. There is no drama, there are no characters created crosswise over missions, and there is no nuance to for what reason you're killing people as promptly as you do the walkers. It has next to no to do with what makes The Walking Dead so incredible.


Also Read: Anthem | Preview, Release date, Gameplay, News, & more...


Overkill's the walking dead: Gameplay

The biggest enemy in The Walking Dead—besides, you know, the walking dead—is noise. Nothing floods the roads with zombies quicker than a noisy blast or a jukebox firing up a Queen track. most of the missions in The Walking Dead is a stealth mission. Basically, this makes the game fundamentally the same as Overkill's past co-op shooters, Payday and Payday 2. In those games, heists start out calmly until the point that an alarm gets activated and the best way to get out alive is to go loud.

Missions are diluted into more stealthy issues therefore, which can be somewhat engaging when you're working closely with teammates. As a major aspect of an efficient group you can keep noise to a minimum and dodge enemies completely, yet it generally just takes one player not sticking to the script to ruin a run. making the situation worse, there's no help for voice chat in-game nor some other approaches to communicate besides text talk, which is a huge bummer.

Check out this amazing gameplay from Polygon


Killing a couple of scattered zombies with baseball bats and blades is simple enough, however, in the end, somebody will make a noise calling for backup. Regardless of whether it's a gunshot, a blast, or a car alarm. If your group is messy, in the end the group will get too thick to battle at all, and the only wise thing left to do is run.

Even though fighting zombies is pretty simple, but you don't wanna get too close to them as they will grab you and will drain your health to a good amount as it takes some time to shove them off.

It's too awful that slaughtering zombies with melee weapons is so essential, though, because these weapons aren't much fun to use. There are machetes, baseball bats, and pickaxes, but they all feel clunky, and pretty much the same. And also fighting off thick crowds of zombies, again and again, becomes boring, but what satisfies me the most is the wooden tunk sound I get from smacking a zombie right in the skull.


Also Read: Hitman 2 | Review, Trailer, Gameplay & Everything else you need to know.


Overkill's The Walking Dead: Characters


In Overkill's The Walking Dead, you take control of one of four new characters, each with their own uninvolved weapon specializations and one of a kind aptitudes. For instance, Maya is the medic and her unique ability is tossing down a med bag that can heal up anybody in your group. Aiden, on the other hand, gets streak blasts that can daze human enemies and distract zombie crowds.

Each character is fun in their own particular manner and, in spite of their strengths, anybody can utilize any weapon you discover, giving them a helpful adaptability. The distinction, however, is that they won't have the capacity to apply any of their skill upgrades or passive rewards to upgrade a weapon outside their wheelhouse.


But beyond that, the difference between the characters are for the most part detail driven other than a solitary unique skill. 


From its restrictive mission structures, unbalanced difficulty and baffling methods of progression, The Walking Dead struggles to justify the time it requires from you. It's a collection gameplay diagrams stacked upon each other without insightful thought on how they may durably cooperate, wrapped with a dull presentation and ordinary combat that once in a while energizes. The Walking Dead is a wreck of scattered thoughts and an absence of direction, and there's no reason to make sense of it all.


Also Read: Resident Evil 2 Remake | Review, Trailer, Release date, News, Gameplay, and more...


The Verdict:


It's fun when you cooperate with friends and escape the horde of zombies by sneaky ways. But, it's all wrapped with a package of various disappointments: Technical issues, unavoidable repetition, and dull shooting experience.


Experts Reveal Why Riding With Your Feet On The Dashboard Can Harm You Badly


ORBAT - Soviet Divisional Units, Part 2 MRD Artillery Regiment


This post looks at Artillery support within the Division and specifically at the composition of the Divisional Artillery Regiment, how the capability changed over the period and how it might be represented within games and scenarios.

The organic components of Divisional Artillery units were  broadly consistent across both the MRD and TD however their detailed composition varied, these Artillery units included:
  • Artillery Commander and his Staff
  • Artillery Regiment
  • Frog Battalion
  • Anti Tank Battalion (not in TD)
  • Artillery Battalions of subordinate MRR/TRR
Whilst in other armies air defence would be a component of the Artillery in the Soviet Ground Forces this was a separate arm of Service.  The Anti Tank Battalion's deployment and grouping have been considered in an earlier post and I'll leave the Frog Battalion for another day.


Equipment and Organisational Change

The composition of the Divisional Artillery Regiment and the amount of organic artillery available to the Division varied significantly over the period from the 1970s through to the end of the 1980s and whilst my focus is on the 1980s it's worth understanding this as it accounts for a variety of conflicting information presented across the various sources which can lead to confusion if the general pattern of transition is not understood.


In the 1970's the MRD's Artillery Regiment comprised two battalions of towed 122mm D30 Howitzers  and 1 battalion of towed 
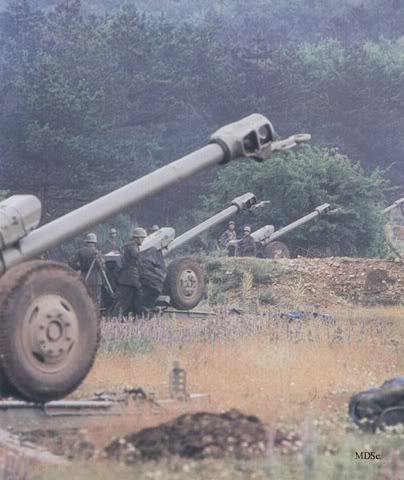
152mm D1/D20 guns, in a TD this was 3 Battalions of towed 122mm D30 guns. Each regiment included 3 Batteries of 6 Guns and most units used trucks as the gun tractors.

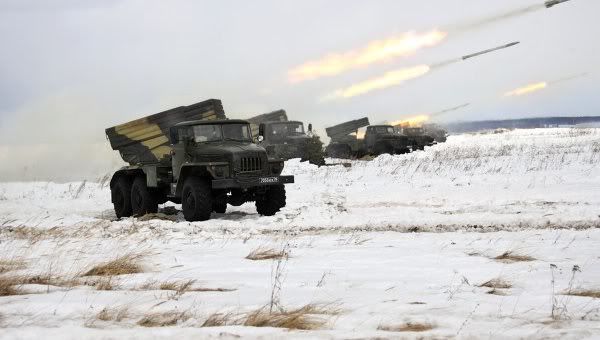
By The end of the Cold War units would have an Artillery Regiment equipped with self propelled guns, in MRD's this could include 3 battalions of 2S3, in TD's 2 battalions of 2S3 were more likely.  In both cases batteries were of 8 guns and the regiments included an MLRS Battalion also of 3 batteries of 8 Launchers. The 8 gun and 8 launcher batteries seem to have been largely confined to GSFG.


The MLRS units were incorporated into the divisional Artillery Regiments in the mid 70s and 2S1 and 2S3 started to be introduced to replace the towed guns and howitzers from around 1973.  As individual Regiments transitioned from the D30/1/20 /MLRS mix through the introduction of initially a mix of 2S1 and 2S3 and then to all 2S3 units this created the conditions for a variety of Orbats to exist within the divisions of any particular Army or Front at a given point in time.  The limiting factors on the transition and the principal cause of the variability being the rate of production and the sheer size of the Soviet ground forces, of note 2S3 production did not complete until 1993.


The broad roll out following acceptance in 1971 as outlined by Zaloga was:
  • From 1973 1 2S3 battalion to each MRD Artillery Regiment: A MRD could include 2 D30 battalions and 1 2S3 battalion
  • From 1973 1 2S1Bn to each Cat 1 TD: A TD Could include 12S1 and 2 D30 battalion 
  • From mid 70s 1 122mm D30 battalion was replaced by 2S3 in TDs: TDs could include 1 2S1, 1D30 and 1 2S3 Bn 
  • Cat 1 MRD received 6 battalions of 2S1 two in the Artillery Regiment and 1 in each of the maneuver regiments:  MRD Artillery Regiments could have a composition of 2 2S1 battalions and 1 D1/20 or 2S3 battalion. (this also rather defeats the view of BMP units having 2S1 battalions and BTR units having D30 equipped battalions)
  • Cat 1 TD received 6 battalions of 2S1 taking them to 3 2S1 battalions or 2 2S1 and 1 2S3 battalion. 
  • Additional 2S3 battalions were deployed releasing 2S1 Battalions to the maneuver regiments
  • All this did not happen as a simple sequence and the different policies and deployments interacted with each other unpredictably.

So what does this mean from the Wargames perspective, there were a lot of options, it was a big army, the role out did not complete before the economic impacts at the back end of the Cold war began to hit.  You have a lot of choice, my late period Divisional Artillery Regiment has one 2S1 battalion and two 2S3 battalions. For operations the Soviet Army task organised units into Artillery Groups which introduced a lot more variation and are discussed further below.

The weapons thrown up by these changes were re used, initially they increased the Regimental artillery from a battery to a battalion and as towed assets in these units were replaced with Self propelled platforms then the size of Army and Front Artillery brigades were increased. The quantity of organic Artillery in the division including the regimental Artillery units therefore increased from a likely minimum 78 Guns in the 70's to  a maximum 192 guns by the end of the Cold War.


The broad equipment change time line over the period with respect to Artillery equipment looks like this:
  • 1963 D30
  • 1966 PSNR 1 Ground Surveillance Radar
  • 1971 2S3 entered production
  • 1972 2S1 entered production
  • 1973 first deliveries 2S1/2S3
  • 1974 ACRV IV 12 Series Vehicles
    • IV13 Battery fire direction centre, 
    • IV 14 Battery Command Vehicle with PN44 night sight and D11M-1 Laser range finder,
    • IV15 Battalion Command vehicle with additional radios, 
    • IV16 battalion Fire Direction Centre with Field Artillery computer
  • 1975 SNAR 10 Target detection and fire adjustment
  • 1975 PRP 3 with PN 61 Image Intensifier, D11 Laser Range Finder, IV 520 Fire Control , Computer, dismountable D13 LRF (I think this came later), RL 126 ground surveillance radar
  • 1975 2S3M upgraded loader increased rate of fire
  • 1976 PSNR-5
  • Late 70s DK-1 Dismountable LRF Sage Gloss at Regiment and Division
  • 1980's 9M28 Rocket Grad P (Airburst)
  • 1980 PRP 4 as PRP3 but with PN 71 Thermal Imager a D14 LRF and PSNR -5 ground Surviellance radar
  • 1983 ACRV upgrade
  • 1986 152mm PGM 2K25 Krasnopol complex deployed by 2S3. The 122mm Kitalov 2 complex was a post Cold War system deployed in 2002
  • 1987 2S3M1 Gunsight and data terminal to receive display command information from IV 13
  • 1988 PRP 4M

So not dissimilar to Western developments with the principal areas of change being:
  • The Introduction of Self Propelled Guns.
  • The Introduction of dedicated Command and Observation Post vehicles specifically equipped for role.
  • The development, deployment and improvement of target acquisition systems including radars, lasers, and night observation systems.
  • The development, deployment and improvement conventional munitions to include PGMs and sub munitions.
  • The development and deployment of data systems for processing and passage of command and fire control data.


A wide range of munitions were available for both 122mm and 152 gun systems for the 2S3 these included:
  • OF-540 HE
  • OF-25 HE Frag
  • BP-540 HEAT-FS
  • Br-540B AP-T
  • OF-38 Krasnopol Laser Guided
  • S1 Illuminating
  • ZH3 Smoke
  • and Nuclear Warheads with a 2kt yeild


The impact of all these changes were quite considerable in terms of the effectiveness of Soviet Artillery the impacts included;
  • Increased protection of the gun crews, 
  • More rapid displacement between fire positions, 
  • Reduced time into and out of action, 
  • Improved target acquisition 
  • Increased range, of munitions and target acquisition capability
  • Reduced time to resolve targets at greater ranges
  • Increased speed of transmission of artillery data reducing engagement times and data errors.
  • Increased speed of processing fire missions, through use of fire control computers
  • Improved Lethality, both through munitions developments higher rates of fire and the increase in size of the fire unit from battery to battalion.
These increases in the scale efficiency and overall destructiveness of Soviet Artillery over the period and acted as a significant counter to NATO proliferation of handheld anti tank weapons and enabled the Soviet Army to reduce its doctrinal dependence on nuclear weapon use.
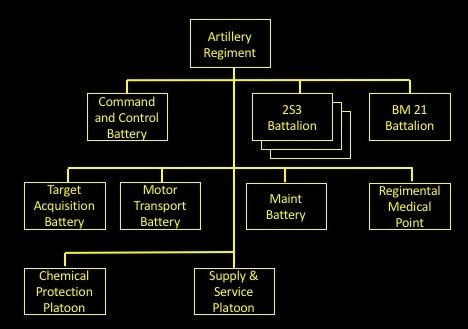
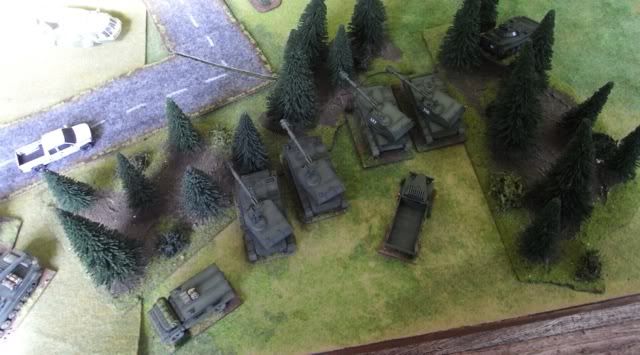
The Divisional Artillery Regiment

The Organisation of the Divisional Artillery Regiment is outlined in the diagrams below, TD's would generally only deploy two battalions of 2S3.  Both Isbey and FM 100-2-3 contain detail on the composition of the various Sub Units.


From a Wargames perspective the main elements that we might want to represent will be rules dependent, from my point of view these are:
  • Command and Control Battery
  • 2S3 Battalions
  • BM 21 Battalion
  • Target Acquisition  Battery
  • Regimental Aid Point
The gun battalions and BM 21 battalions are  broadly similar organisation and include:


For my games I use a vehicle scale of 3:1 so I represent the battalion as 3 batteries with each battery containing:

  • A supply truck, either a Zil 131 or a URAL 4275, 
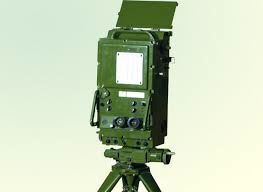
  • A command vehicle either an IV 12 Series COP/FDC (2 batterys per battalion) or a BTR 60 PU radio vehicle (1 battery per battalion and effectively representing the Battalion HQ). 
  • 2 firing platforms 2S1/2S3 or MLRS depending on the unit type.  
From the battalion I deploy two OPs using the ACRVs as theoretically this organisation could generate seven OPs if required:

  • 4 from the COPs (IV13/15) 
  • 1 from the PRP 
  • 2 additional flanking OPs which would be created on an Ad Hoc basis from battery staff and vehicles.
The Regimental Command and Control Battery


A BTR 60 Command Wagon represents the 3 ACVs admittedly 2 are MTLBus but I have a lot of them in the unit already. Other than that I have added 1 UAZ 469 and 1 Gaz 66.  I also included a PRP 3 which might seem a bit strange.  

One of the things I wanted to resolve within the HQ was the representation of PRP 3. Because of the way the PRPs are distributed with three sitting  in the Regimental Artillery battalions (one each) and three in the divisional Artillery battalions (one each) and one in the Target Acquisition Battery.  You end up with no representation of the vehicle due to the 3:1 vehicle scale, which is a shame as its a good looking wagon. Technically two would be deployed within the division (at 3:1) to accommodate this I added one to the Regimental HQ and one to the Target Acquisition Battery

The Target Acquisition Battery


It's a bit of a challenge to work out what's going on here and with this organisation having components that would sit in the off board force and the onboard force it needs to be divided up.  This is how I viewed it;
  • Recce Platoon @ 2 BTR 60/70/80 + 2 LRF - represented by 1 BTR 60
  • Comms Platoon @ 1 UAZ 452 Compute, 3 UAZ 469, 3 Gaz 66 - 1 UAZ 469, 1 Gaz 66
  • Surveillance Radar Platoon @ 1 SNAR 10, 1 PRP3, 1 Counter Mortar Radar - represented by 1 SNAR 10, 1 PRP 3 (see above for explanation).  The SNAR 10 would normally be deployed along side Artillery COPs.
  • Sound Ranging Platoon @ 4 Gaz Vans, This example of the 1B19 Complex provides a view - 1 Van
  • Topo Survey Platoon - not represented
  • Met Survey Platoon - not Represented
  • Radar Platoon - 3 radar direction finder, 3 Gaz 66 - 1 Gaz 66 and a PSNR -1 or 5
So In Summary 1 BTR 60 ACV, 1 UAZ 469 & Gaz 66, 1 SNAR 10, 1 GAZ VAN, 1 GAZ 66 + Radar.  I have found no source data that attributes the number of vehicles to the platoons within the Target Acquisition Battery so have applied some thought and generated the answer. If anyone knows of better data on this I would be grateful for any pointers as to a more accurate representation. 


Regimental Medical Point


FM 100-3-2 covers the Regimental Medical Point under the MRR and I have assumed its the same for all regiments.  The core of this is a treatment section and one or two collection sections. I assume of the four Ambulances available three are in the collection section and one in the treatment section and the other sections all collocate with the treatment section. I have gone for a three vehicle representation of a Gaz 66 for the Treatment section and 1 UAZ 452 for each collection section.


Krasnopol

Krasnopol was a Precision Guided Munition(PGM) for 152mm Artillery pieces deployed in the late 80s. PGM's effectively allowed artillery firing in the indirect fire role to engage point targets such as vehicles or field defences.  This was achieved through laser target marking and steerable control surfaces on the projectile allowing for in flight course correction.  The amount of correction possible  was limited so the round had to be lobbed into the right space relative to the target and the observer for the whole thing to work. Rounds were provided for all the major 152mm systems in Soviet service. The complex consisted of the OF 39 projectile and a D15 Laser Target Designator together with a couple of command devices one for the gun line and 1 for the OP.


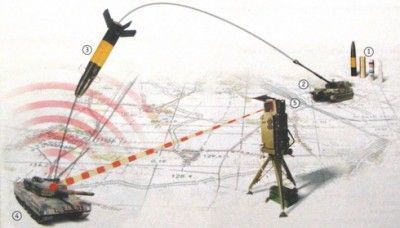
Getting the round in the right place at the right time from the right direction to acquire the illuminated target was critical to success, as was the need to limit the time the target had to react. All this required a degree of thought to be applied to the process, as such engagement zones needed to be recced and engagements planned. This required a degree of preparation of the target zone and the gun line which would improve hit probability and reduce the effectiveness of any target counter measures.  Clearly more Ad Hoc engagement would lead to a lower probability of hit.


Krasnopol was allocated in sets, each set included;
  • 50 Rounds 
  • The shot synchronization system
  • The LTD.  
A battalion might be allocated 4 sets for a total of 200 rounds.  Common practice seemed to allocate one battery as the Krasnopol Battery and one platoon within that battery as the Krasnopol Platoon .  This platoon would carry 140 of the 200 rounds with the remainder being spread across the rest of the battalion. One LTD would go to each Battery COP and 1 to the Battalions mobile reconnaissance post (PRP 3).

In order to engage the OP had to position between the target and the gun line within a 15 degree arc and within 7kms of the target.  Rounds would be fired in succession into the target area either on command of the OP or every 30 seconds.

Krasnopol seems like very useful addition to the indirect fire inventory of the Divisional Artillery Regiment and one which makes the deployment of the related COPs a consideration from both a task organisation perspective and enabling targets to be engaged. I can think of a number of scenarios where It would be interesting to explore the impact of this such as the deployment of the Anti Armour Reserve at divisional or regimental level and the deployment of the Advance Guard.


Artillery Groups and Control of Fires and Units


With the Artillery assets at its disposal the division artillery staff would form a Divisional Artillery Group (DAG) and a number of Regimental Artillery groups (RAG).  The Division would be allocated assets from Army and Front and allocate assets to its subordinate Regiments enhancing the organic capability.

RAGs would generally only be composed for the units in the first echelon. The implication from the Xenophon lessons on Divisional Artillery is that all the divisions artillery assets would be allocated between the DAG and the first echelon RAGs. RAGs for the 2nd echelon units would be composed prior to that echelon being committed effectively being withdrawn from the first. The staff planning data for these add hoc groups were:
  • DAG 4-6 Units
  • RAGs 3-4 Units (For lead Echelons only)
Clearly these would be impacted by the priority of the axis of advance (main or secondary) and the type of operation, advance, breakthrough or pursuit.


Battalions would be allocated fire units from RAG as required this would generally be when acting as an advanced Guard, Forward detachment or for an assault. The composition and distribution of non organic assets has been covered in earlier posts on the MRR and Non Divisional Artillery Units which contain examples of such groupings and provide a view on the range of units from which these elements might be drawn.

In addition reinforcing fire from the Army Artillery Group and the Front Artillery Group could be superimposed by the higher headquarters as it saw fit or as part of a fire plan.

Groupings and hence control of the Artillery units would change with the different phases of the Plan.  In general the DAG would retain control in the preparatory fire phase, then resources and control would shift to the RAGs for the Assault phases before being transferred to the 2nd Echelon as they were committed.  Fire Units Ammunition and Time slots could all be held in reserve.

I aim to explore this further in a TTP post about the deployment and use of divisional artillery after I have digested some more of the data in the Xenophon archive.


Wargames Representation

Whilst the Divisional Artillery Regiment does not easily lend itself to most peoples idea of a 20mm table top action there are a number of ways its assets can be included in games, although I do admit that you have to try hard. There are a number of mechanisms which allow exploration of their use and role, these include;
  • Direct incorporation into the onboard elements as a focus of the scenario an example might be penetration of NATO forces into the depth of the divisional defence where Reserves and Artillery elements might be the core components of the Soviet Force. Such games can be built as stand alone scenarios or be components of a mini campaign.
  • Representation as off board support providing the Divisional wrap of supporting fires and Air Defence, in this instance the elements needing to be represented would be limited to on board Target Acquisition components.   
  • Representation on subsidiary boards enabling aspects of the depth fire battle to play out using Air, Artillery, Air Defence and follow on Maneuver assets as part of a larger game. Personally I like this approach and a variety of additional commands can be generated around the Artillery, Air and Air Defence aspects allowing examination of both deep and rear operations, both of which had significant impact on the outcome of the engagement being fought.  Without additional players the scope is more limited as there is a significant amount of thinking needed and additional game mechanics to play through that would otherwise consume too much time.
  • Linked Games, pre game play and mini campaigns offer approaches to resolving the issues outlined in the subsidiary board approach and if the number of players are limited offer a way to explore elements of Deep and Rear opps.  The detail of the sequencing of the games then becomes the major challenge.
  • Smaller Scale, heresy so not considered further :). Not my particular poison but alternative scales 1:300/600/700 offer the opportunity to develop these aspects in a more manageable space both from a cost and storage perspective, my problem is I am far to in love with the joys of 20mm to go there.


What gets represented and how the support is applied is a key component of designing the scenario and something for the TTP post and some scenario ideas I have been working on.  Both the Big games covered on the blog the Wisenberg Counterattack and Storming the Weidhouse Gap contained significant artillery components. 

Models and Availability

Having identified that you want to build something as challenging as an Artillery Regiment and you have managed to convince your self that it will get the odd outing. Sourcing the models isn't always easy, the table below outlines a range of suppliers for the vehicles required to represent in whole or part the Divisional Artillery Regiment.


Whilst the coverage of the vehicle fleet is fairly complete now with the release of conversion sets by S&S for the BTR series vehicles some of the ground equipments will require scratchbuilding if they are to be represented, notable ones include:
  • Counter Battery Radars
  • D15 Laser Target Designator
  • DK-1 Laser Range Finder (Imagery of this is proving a challenge to find)
where I have already written a review of the relevant models they can be found here:


References:

Books:
Internet:
Other Posts of Interest


martes, 26 de marzo de 2019

November 2016 $1000 Gaming PC Build

Under $1000 November 2016 PC Build 

Here is a fantastic $1000 pc build that is for those who want to max out games from 1080- and even into 2K resolutions. This build is a well rounded awesome build, put together and built specifically for hardcore gamers. 

Hardware LinkPriceImage
Estimated Price:$966 (November 2016)
ProcessorIntel Boxed Core I5-6600K 3.50 GHz, 6 M Processor Cache 6 for LGA 1151 (BX80662I56600K)$237.39
CoolerCooler Master Hyper 212 EVO - CPU Cooler with 120mm PWM Fan (RR-212E-20PK-R2)$27.98 
Motherboard$134.99
Graphics Card
MSI GAMING RX 480 GDDR5 8GB CrossFire VR Ready FinFET DirectX 12 Graphics Card (Radeon RX 480 GAMING X 8G)

OR - Choose either of these graphics cards

Gigabyte GeForce GTX 1060 WINDFORCE OC 6G (GV-N1060WF2OC-6GD)
$279.99


$259.99


RAM$44.19
SSD$76.49
Power SupplyEVGA SuperNOVA 650 G1 80+ GOLD, 650W Continuous Power, Fully Modular 10 Year Warranty Power Supply 120-G1-0650-XR$88.25
Computer Case$99.00

Overview: Gaming PC Build ( $1000 )

For under $1000, you can get one kick but gaming PC build - playing all games maxed out at 1920x1080 resolutions and into 1440p / 2K resolutions smoothly and at higher settings. This is the High-End gaming PC build, a gaming pc build that will probably cover most of any average gamers needs. This would be the build I would recommend to those wanting a well rounded pc build that covers both enthusiast and regular gamer grounds of performance.